Wednesday 17 October 2012

Photogram slides

I'm posting slightly early because I want to keep my target of one post per week for a bit, and I will be away at the weekend.

Photograms

Photograms are photographs without a camera. They are one of the earliest forms of photographic pictures, very easy to do, and never seem to be out of fashion.

The idea is that you place an object on photographic material (usually photographic paper) in the dark. You flash the paper briefly with some controlled exposure of light, and then develop normally. The result is white where the shadows of the object were and black everywhere else. Images of pressed flowers and plants work well.

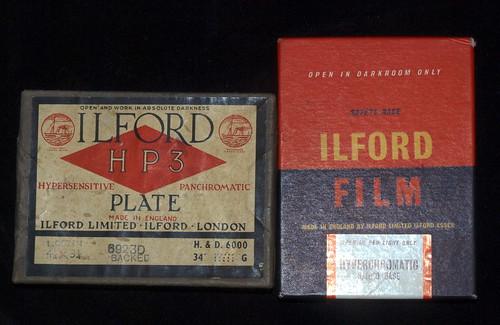
I tried this using very old glass plates, dating to the 1950s I think. I made a 3.25x3.25 inch photogram of a fern on a plate and projected it using my epidiascope. (I used PQ Universal at a dilution of 1+9 for about 4 minutes as the developer. As the old plate was a bit fogged I used some ferri solution to clear the highlights.)

I have not made nor got a screen for the projector yet, so to try it out I projected onto a small square canvas. I photographed it all at dusk.

Garden fern

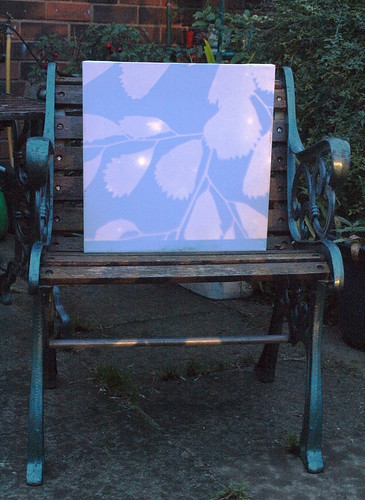
It was somehow nice to bring the fern back to the garden!

Layers

This is hardly "art" but for me it shows some of the essential ideas that I want to explore more: multistage processes with all stages contributing in "layers". All too often a photograph is a one stage click, from a single viewpoint with a single automatic or semi-automatic post-process (whether film or digital). But here we have,

  • The manufacture of the old plate itself, and its decay over time (giving, particularly, larger grain and uncontrolled white spots).
  • The pressed fern as raw material
  • The process of making the photogram, which was itself a controlled two-stage process with develop then bleach
  • The projection of the photogram using the old projector and old light bulb, with its own colour and quality
  • The texture of the canvas onto which it was projected
  • The location of the projection (outside, in the garden)
  • And finally, though it is certainly the weakest point in the whole process in the example above, the photographing of the projection and surroundings.

I find that each of these stages adds something almost intangible, but they all add up, and experimentation with ways of repeating these cycles might build up images with a quality quite special. Anyway, I want to try.

Saturday 13 October 2012

Negative accessory lenses

We are used to using positive lenses as accessory lenses, usually as close-up adapters. These are typically placed in front of the main lens and allow one to focus on closer objects that would otherwise be the case. They work by increasing the strength of the main lens, i.e. decreasing the focal length. They are usually quoted in dioptres: +1, +2, +3, +4, +10, etc.

Telek lenses

In the good old days there were plenty of other lens adapters. One particularly interesting sort is the Kodak Telek lens (sadly no longer made) which were negative adapter lenses. For example, this one fits "series VI" fittings and is -2 dioptre.

Kodak -2 Telek adapter lens

I suppose the reason these are not popular now is that most cameras have fixed fittings and to use a Telek lens on a camera on would have to move the lens further away from the camera. With the right camera, that could be done (just). You could add a Telek lens and an extension tube. Then the result would be a longer focal length, so would magnify more, a bit like a telephoto lens. Definitely worth a try if you have the necessary parts.

I had a Telek sitting in my box of spare parts for some time. I never quite found a particularly good use for it. Until, that is, an interesting vintage lens came in the post which I wanted to try on my 10x8 camera.

M.P. Tench lens

This lens dates to about 1880 give or take a few years, and is by M.P. Tench. Tench had worked with Dallmeyer until he set up on his own. This lens is a simple doublet with an aperture set back well behind, and might have been used as a landscape lens for 1/2 plate, or possibly 4x5.

The problem was that this lens was just a bit too small for my 10x8 camera and (to see it working as I wanted to, the bad parts of its image as well as the good) it was a bit too large for 4x5. The image it made on 10x8 was a circle, but I wanted it to fill the whole frame. I measured its focal length at about 150mm, and realised I wanted something just like it that was about 200mm.

Since my Telek lens increases focal length (at some loss in quality, which would not be significant when one is contact printing 10x8 negatives) it would be just the thing I need. There was a small matter of selecting whether to put the Telek on the front or the back. It turned out that it fitted beautifully at the back, which was probably the best place for it anyway. So that's what I did.

Rear of lens plate with mounted Tench lens

I mounted my Tench lens on a lens-board and fitted the Telek lens to its rear. Since it was a very good fit, and the Telek is very light, I just used blu-tack. Maybe I shall revisit this arrangement one day, especially if I decide this lens is a "keeper", but works surprisingly well for the time being.

That F number thing

One doesn't get something for nothing. By making the lens longer, but with the same amount of light going through it, the light intensity on the film is less. It is this light intensity that is measured by the "F number". (Or at least that's true without so-called "bellows factors", which we will ignore here.)

The rule that was chosen for F numbers way back is the F number is the focal length of the lens divided by the diameter of the aperture. So a f=50mm lens with an aperture 25mm in diameter is F50/25 or F2. This information is important for any new lens. I measured my Tench/Telek combination as f=200mm and aperture of 12.5mm so decided it was F16, which seems slow by modern day standard but is fairly typical of vintage wide angle lenses and perfectly adequate for what I wanted.

Testing it

Armed with the information about F-numbers I took my camera off to try it out. I loaded some film holders with photographic paper, which I find is much quicker to develop and scan for testing purposes.

For the first test I wanted to see how the lens behaved when focused at infinity.

Sparkhill park

This was a difficult contrasty subject, and I reduced the contrast here: any lack of contrast is not the fault of the lens. You can see in the corners where the lens is not quite covering the frame, but it gets close and the effect is quite pleasing. The lens has a very nice "antique" look to it, especially in the corners.

For the second test I want to to focus up close and study the out of focus background.

Sparkhill park

When focused close, there are no longer any coverage problems. Again, it is very pleasing look, with a noticable but subtle swirl in the background.

Sunday 7 October 2012

Camera fair challenge

There will be more on the epidiascope shortly. Today was the day of the Wolverhampton Camera fair, and as usual this was a lot of fun. And to spice it up a number of us made each other a challenge, which is the subject of this blog post.

Under a tenner

The challenge was to buy kit for under £10 and use it to take a photograph that very afternoon. That means there's little time for tinkering or mending and using additional kit from home is cheating.

One approach would be to get a cheap throw away camera. Another was to get a toy camera such as a Diana or similar, or a semi-working 35mm camera. Light leaks if any would be part of the fun.

I decided to put together an antique 1/4 folder from broken parts. I picked up a broken body with no lens or film holders and a cracked glass screen for £3, a old lens (not original to this camera, in fairly poor condition with non-working shutter) for £2, and from a separate stall got a small set of rather rusty plate holders for £2.

Old quarter plate folder

A number of people at the camera fair today had quite a lot of old glass plates for sale, and I love using these. I did a lot of searching in dealers' junk boxes and eventually bought a pack of 12 for £2.50 and that brought my total to £9.50 for the challenge. Unfortunately, in the heat of the moment putting everything together over lunch, I couldn't figure how to load the plates into the holders. Eventually I gave up and used some antique sheet film I had brought with me instead (bought on ebay for a similar price).

Quarter plate film

I used the film on the right. As you will see shortly, I would have been better with the glass. But the holders had metal sheet film sheaths in them, and these sheaths had rusted tight so I couldn't see how to get them out. Pity. (The sheaths come out by pushing them down against the spring at the bottom. A strong fingernail was needed to undo the effect of the rust gluing the pieces together.)

Putting it together

The lens and shutter goes into the obvious hole in the front of the camera and are held in place by a retaining ring. This ring was very difficult to turn, and I had to leave the lens in a somewhat wobbly state. (In fact, I found later it was not the correct ring as it had the wrong thread. What you get from rummaging through junk boxes.) I improvised a film canister lid as a lens cap and shutter. And loaded the film into the holders in the dark bag I had brought with me.

Old quarter plate folder

At least it's starting to look like a camera now!

I was lucky that the lens (a Beck Mutar 4.75 inch) I had picked was only a centimetre shorter in focal length than the one the camera was designed to take. So I could focus reasonably well onto the broken screen.

The plan was to use the lens on its smallest aperture (f32, or so the shutter said) and use the improvised lens cap as shutter for exposures of about 1s. This was rating the film at about 20ISO. The first attempt was a failure as the film came out of the holder when making the exposure. (It seems the holder is a little too large for the film, or the film too small. Both say 3.25x4.25" but the film does date 50 years after the holder.) I just about managed to succeed to make the next two exposures, but the fourth also suffered from the film coming out of the holder.

Results

I hardly expected the results to be hi-fi.... Note that I trimmed the negatives to be long and thin so that I can scan them with my 120 film scanner.

New camera

This was taken with the camera on the ground, and the lens wide open. At least it's recognisably an image...

Some spaghetti

This has a bad mark SE to middle E where the film accidentally came out of the holder and got folded when I returned the darkslide. It is also fogged at the top because the dark slide didn't go all the way. Ho hum. But at least it has some life to it, and apart from the film problem mentioned there are no other obvious light leaks or problems!