What to do with one of those huge lenses? I don't mean the modern very long telephoto lenses designed for your DSLR that probably cost £thousands. I mean those interesting and very impressive pieces of glass that were designed for specialist antique cameras that are not seen any more, and look so good and so tempting that you might just buy one at a fair or car-boot or on the *bay. After all, they are very large and were once very expensive, and that must mean they are very good, right?
The lenses I am thinking of are often 4-6 inches across, a similar length, weigh 1-2 kilos, and either came from an old process camera (which means they were used once for copying maps or making prints or posters or adverts or suchlike), or came from a aeroplane (where they were used for aerial reconnaissance), or possibly came from a very large projector, or epidiascope (a bit like an overhead projector) or something similar. All these are industries of yesteryear, so the lenses are being sold off on second-hand markets, and and currently available and often inexpensive.
Actually, lots of people (myself included) seem to be tempted into spending money on large lenses, though if you are tempted have a good think beforehand, what it is worth and what you will do with it. It is not so easy to think of uses for these old lenses.
Applications and problems
The main problems with these lenses are their size, focal length, and design. They may have been designed for huge cameras, or for copying at 1:1, which may limit their use to normal pictorial photography. But the main thing is they are heavy, typically with long focal length, and are not telephoto in design which makes them more difficult to operate on a small camera.
Telephoto lenses are lenses that have been specially designed to be small and compact for their focal length. A telephoto 500mm lens is less than 500mm in length. This is good as you don't want half a metre of lens in front of your camera. But a non-telephoto of focal length 500mm will have to have its centre 500mm away from the film or CCD in your camera. And that may be a long way to hold a very heavy lens. The mount will have to be very strong to hold the lens at one end and the camera at the other without sagging.
So unless your building skills are very good, these heavy long lenses are likely to be difficult to mount on your DSLR. I will show you an idea on how to mount such a lens soon, but first here are some other ideas.
Build a very large camera. These big lenses are big not so much because their focal length is long but because they make a very big image. It makes sense to use them this way. But building and using ultra large format (ULF) cameras is a bit of a specialists art, and not for the faint of heart.
Modify the lens. Inserting a "reducing" element between the lens and film (usually a positive achromatic lens) is a good idea. It makes the lens behave like a shorter focal length lens, and that size is used less for coverage but more for brightness of image. In other words you can get a super-fast lens this way. Unfortunately reducers reduce image quality, and you can only go so far this way. But it is worth trying.
Mount the lens anyway on your DSLR, perhaps for some specialist use only where the size and weight and complexity is less of a problem. This is what I will do here.
Telescopes from old camera lenses
I had a large 450mm f/4.5 lens from a wartime epidiascope and decided to try to mount it for my DSLR for astronomical use. This made sense as the size of the lens equates to light-gathering power, highly desirable in astronomy. I am not a serious amateur astronomer, I just wanted to make a telescope myself quickly and cheaply from parts I happened to have available. If you want to make yourself a really good telescope, this is unlikely to be the best way to go about it, but it is fun.
The main problem is how to hold a kilo of glass and aluminium rigidly half a metre from the camera. I decided to make a mount from lots of plywood and glue. (I have limited time, so like to put together my projects quickly. Modern glues are very strong, and plywood is light, strong and I had some available.)
So I measured and cut out my plywood. Making the holes to accept the lens was the hardest part.
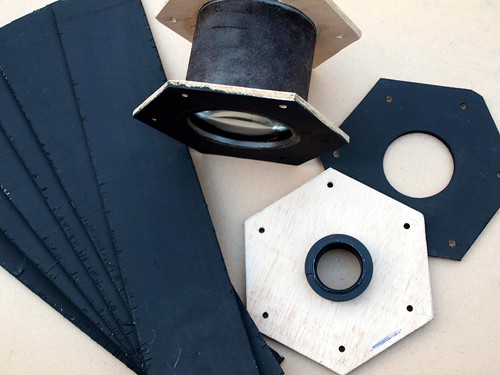
It is important not just to know the focal length of your lens, but where this should be measured from. In fact the back focal length is a more useful parameter for construction - this is the distance between the back of the lens and the image when focussed at infinity. The best way to measure this is project a sharp image of the sun onto something. The focal length is useful to know too - this is essentially the magnification of the image at infinity, and will normally be written on the lens. It's a bit harder to measure unless you have some other lens to compare against.
After some more work, and quite a lot of glue, my lens was starting to take shape.
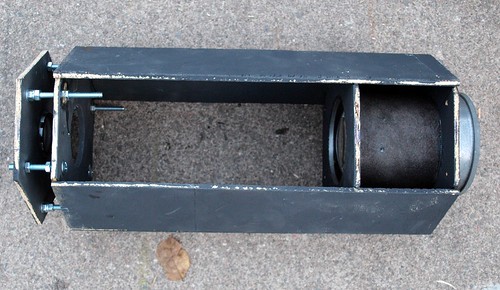
Now comes the hardest bit - making sure everything is in the correct position. This has to be accurate to a fraction of a millimetre, and even worse the lens must be central and square on, not at an angle. As you can see, my construction is not this accurate, and few DIYers' will be. The important thing is to devise something that will allow you to set up the mount accurately and that what all those screws on mine are for. They are for collimation - putting the lens and camera in a straight line. I did worry too much about the lens being exactly central (this is not so critical it turns out) but the screws enable the angle of the lens to be altered and for fine focus to be set up.
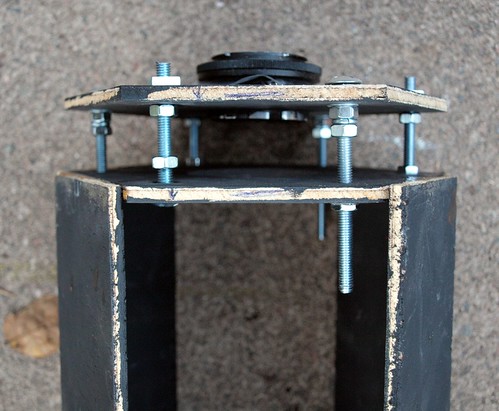
It is important that collimation is done by adjusting three screws only. (The reason is the same as why a three legged stool never rocks, but four-legged chairs often do unless you put a beer mat under one leg.) But I was worried that my three adjustable screws couldn't carry the large weight, so I added three more - not for adjustment but to secure everything when it is all set up. In fact the weight is not so much of a problem as I will set the lens on the tripod, so the screws only have to hold the weight of my DSLR (a rather light model), but even so I wanted to be safe.
That was a week-end's work. I have also mounted the lens on a tripod, and checked that I can focus the lens by roughly focusing against something on the horizon. (For these large lenses, this focus might be a millimetre or two different from the focus point for an astronomical object.) All the gluing is setting and I need to tidy up and try it out sometime soon. More in this blog soon.